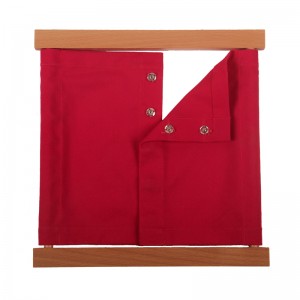
By playing with this frame, the child will develop coordination, ability to concentrate and skills of independence. This frame is made from cotton material and contains five snap buttons.
On the surface, the child is learning to manipulate snaps so that she can dress herself. Fun and practical! A little deeper, we see that she’s developing neural motor connections, following logical steps, exercising decision–making when she chooses to do the activity, problem–solving when she sees her own mistake, and so much more.
This product is also suitable for persons with disabilities, special needs and those recovering from brain injury.
Size: 30.5 cm x 31.5 cm.
PLEASE NOTE: Colours may vary
Presentation
Introduction
Invite a child to come by telling them you have something to show them. Have the child bring the appropriate dressing frame and have them place it on a specific spot on the table you will be working at. Have the child sit down first, and then you sit down to the child’s right. Tell the child that you will be showing him how to use the snaps.
Unsnapping
Place your left index and middle fingers flat to the left of the first snap on the left flap of the material.
Pinch the right flap next to the button with your right thumb and right index finger.
With a quick small movement, pull your right fingers up to undo the snap.
Slightly open the flap to show the child the unsnapped snap.
Gently place the top part of the snap down.
Unpinch your right fingers.
Slide your two left fingers down the material so they are next to the next button down.
Repeat these opening movements until all the snaps are opened (working your way from the top to the bottom).
Open the right flap fully and then the left
Close the flaps starting with the left flap and then the right.
Snapping
Place your left index and middle fingers flat next to the top snap.
Pinch the right flap so that your right index finger is on the top snap and your right thumb is wrapped around the material and below the under part of the snap.
Carefully place the top of the snap on top of the point part of the snap.
Remove right thumb.
Press down on the snap with your right index finger.
Listen for snap noise.
Lift your right index finger off the snap.
Slide your left fingers down to the next snap.
Repeat movements of closing the snap.
Once done, offer the child the opportunity to unsnap and snap the snaps.
Purpose
Direct: Development of independence.
Indirect: Acquiring coordination of movement.
Points of Interests
The noise made to indicate the snap has been successfully snapped closed.
Age
3 – 3 1/2years


